

The pictures are kinda small, but if you click on them you can see them larger. First the "underpinnings". A chemise, kind of like a slip, and corset. The trek time period is late 1850's, so corsets with front opening metal busks were in use, but the "tight cinching for waist reduction" we all think of when we hear corset wasn't a part of it. It was just their version of a bra.

I drafted my own pattern for the corset using duct tape. I enlisted dh to wrap me up in it over a T-shirt. Not one of our usual activities, I assure you! Notice the two extra grommets. Those are not supposed to be there. Oops! This thing would have also had metal boning. Mine only has bones along the back opening edges. The rest is stiffened with rows of "cording", tight rows of crochet cotton stitched in narrow channels.

Next come the split drawers. The drawers were actually optional. And despite the being split, are pretty covering.

The chemise can be tucked in as shown, or the drawers can be worn under the chemise and corset. When worn underneath, the split feature becomes very helpful, I hear. When worn tucked in, you get some nice boofy butt.

Next are the petticoats.


I went the cording route with 35 rows spaced in sets of 3 to 5. The cording also has the advantage of preventing your skirts from getting caught up between your legs as you walk.

Topped with another, plain, petticoat. I starched the petticoats, bonnet and aprons by submerging them in a mixture of Stayflo liquid starch and water, then ironing them while damp. Took forever! I can't imagine doing that on a regular basis with a cast iron iron I have to heat on a stove or fire. The starch will protect them from staining and made them nice and crisp/stiff. I now fully understand the phrase "rustling petticoats." They literally make noise when moved!
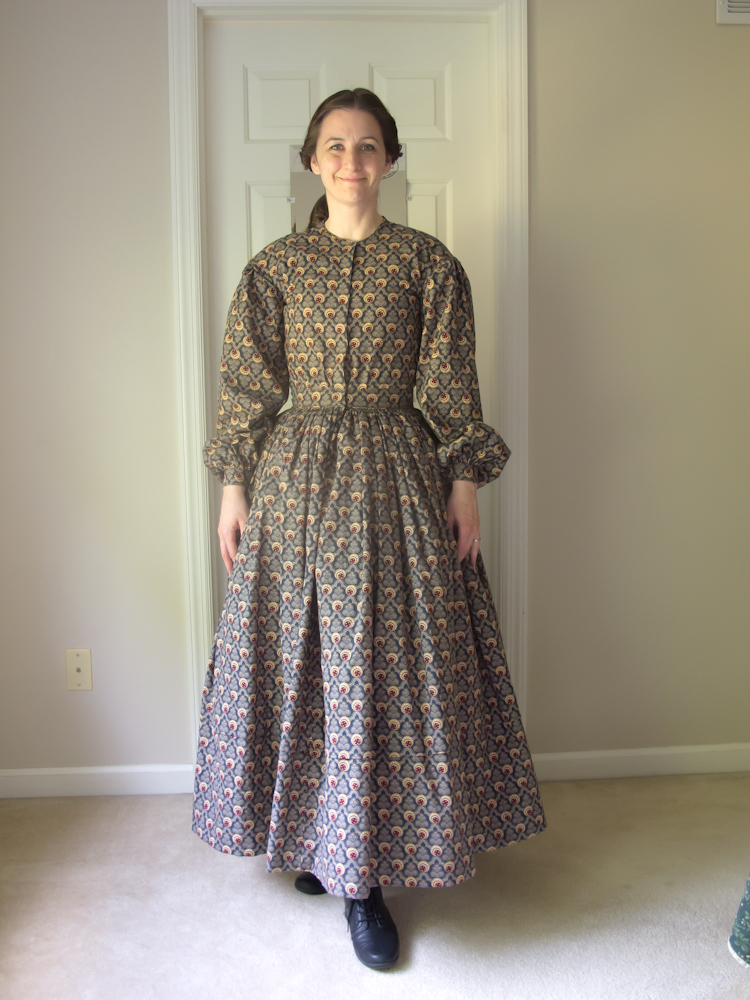
Then the dress. This is what modern re-enactors would call a work dress. Coming up to the base of the neck, closed with hooks and eyes, with full bishop sleeves that can be rolled up, if needed. A wool or silk dress would have darts, but a cotton dress is pleated or gathered, this is the latter. The fabric is a civil war reproduction print. I drafted the patterns for the bodice and sleeves myself. The dress has piping (my first ever) at the neckline, waist and armscye (shoulder seam). Notice the armscye is dropped off the shoulder. This made the shoulders appear wider, creating an illusion of a smaller waist. The skirt is on the short side, in order for ease in "trekking". I did add a tuck to it that would allow me to drop it up to 4 inches later, if I choose. The skirt is made of four full width panels of fabric. In order to get that much fabric gathered into a fitted waistband, a technique called gauging is used. Two hand stitched rows of stitches are used to tightly pleat the fabric into accordian folds. One edge of those folds are then whip stitched to the bodice, just behind the piped edge bottom, so that the skirt actually hinges off and out on the bottom of the bodice. This looks very tidy and adds boof factor to the skirt.

Then the accessories: A fringed wool shawl, apron, long stockings, a neckerchief to protect the neckline from soiling, boots and a bonnet. The boots are not quite right. They should be leather with square toes, but that wasn't in my budget.

The bonnet is corded, as well, to stiffen the brim. Some bonnets would have stiffened the brim using strips of cardboard, called a "slat" bonnet. Since I'm likely to encounter rain, I decided to go the corded route. The back is long enough to provide sun protection and shade to the neck and shoulders.

So, there it is. Pioneer clothing ready to go. Hiking in this full outfit is probably going to be miserably hot. So, I'm not likely to go with the full set of layers, at least most of the time. Curiously enough, I was reading a woman's account of her experience in the Martin Handcart company yesterday. By the end of the trek, her son's pants were in rags and their feet freezing. She then used all of her underpinnings to protect their legs, so when she finally made it to Salt Lake City, she was ONLY wearing two skirts. So, I'm thinking she went almost the whole way with a full set of layers.
Credits:
I would like to thank Elizabeth Stewart Clark's The Sewing Academy website, forum and compendium. Also her book, Practical Pinkery. All of which were greatly helpful in my mid-century clothing education and without which the success of this adventure would have been impossible. In addition to Practical Prinkery, I used the following to help me, most of which are links to Instruction Sheets created by Elizabeth Stewart Clark:
How to Sew a Chemise
How to Sew Split Drawers
How to Sew Petticoats
How to Sew an 1857 Sunbonnet
How to Sew a Slat Bonnet
(I adapted the information from the above two for my bonnet.)
How to Make an Apron
How to Make a Fringed Shawl
How to do Pioneer Hair
Wow. Just wow. What an amazing accomplishment! I dream of sewing like you some day. But meanwhile, I'll be trekking this summer too, but in a skirt and bonnet borrowed from my sister.
ReplyDeleteAmazing Nettie! Truly amazing!
ReplyDeleteWow Nettie! That really is amazing, all that cording looks really tedious, but really beautiful!
ReplyDeleteOh, MY GOODNESS. You ROCK!
ReplyDeleteThese are incredible Nettie! Great job!
ReplyDeleteDear Nettie, Well done. Period illustrations and text sources do reference wearing the drawers over the bottom of the chemise. The chemise does the "work" of covering and protecting the clothing from the wearer. The open inseam and volume of the drawers, plus volume of the chemise takes care of the "mechanics." My wife assures me that it all works worn this way with here 1860s clothing.
ReplyDeleteVery respectfully...
Dear Nettie: I have been searching for weeks for a perfect image for the cover of my novel "Tributary." It is a coming-of-age novel set in 1870s Brigham City, Utah. The novel is based on my ancestors' lives.
ReplyDeletePlease email me if you would consider letting me use your photograph. I will be happy to send you the cover mock-up, so you can see exactly how we cropped one of your photos. The publisher would also pay you and include a link to your website on the book's credits page.
What a great outfit! Really, there is nothing like it online. You do beautiful work.
We have to meet a deadline by Friday, so I would deeply appreciate a fast response. And if you have a high-resolution photograph, that would be great!
Barbara
barbarakayrich at gmail dot com
How lovely you look! I'm LDS too, and I've always wanted to participate in a trek. If I ever do (living in far away Sweden, that's far from certain), being a reenactor and seamstress, it'll be in period clothes. You made a very authentic looking outfit, you're not even on the same scale as most other LDS treckers I've seen pictures on. All credit to you!
ReplyDeleteThis is fantastic! Can you please, please, please share how you made the duct tape corset pattern...and also how you made it with the cording? I will be doing trek next summer and am trying to get my period correct costume together. You did a great job on everything!
ReplyDeleteTiff, I just wore a fitted T, then we carefully wrapped duct tape horizontally around my body where the corset would be. I don't have much cleavage, so I didn't wear a bra and it was fine. I'm not sure what you do if you have some. We then drew lines with a sharpie where the seams should run and the edges of the corset on top and bottom. (After looking at period images online.) Then cut it up the center back to take it off and cut each seam line and the excess T off. This makes the pattern pieces that will lie flat. Just add seam and hem allowances. Oh, and label carefully each one, none of them are interchangeable. To do the cording, after I had sewed and pressed open each seam, I stitched the lining and outside together along a seam. I believe quilter's call it stitching "in the ditch". Then I pressed a light cording inside, against and along the seam and used a zipper foot to sew tightly against it. Then kept adding another row on both sides of the seams until I got the stiffness and support I wanted. I figured out how to do all of it by seeing what others had done and shown online. I no longer remember any of those links, unfortunately.
ReplyDeleteJust found this--you've done a great job with the resources, and I'm tickled you liked them! I'll be pinning your image as an example of "doing it RIGHT!" Thanks for sharing your great work!
ReplyDeleteElizabeth Stewart Clark (ID links to my personal blog... but if any of the links to the articles went dead in our last update, you'll still find them all in the Compendium at www.thesewingacademy.com )
Thank you, Elizabeth! It is so fun to have you visit my blog and see my work. It's the ultimate validation of my efforts!
ReplyDeleteIT LOOKS GREAT!!!!! but I cant get the patterns to open they keep saying 404 and I've done it many times?!?
ReplyDeleteThank you, Elizabeth! I think the links to The Sewing Academy sites are no longer good, but you can find them all here: http://www.thesewingacademy.com
ReplyDeleteThe hair and sunbonnet links are still good. If they aren't working for you either, I don't think it is a link problem.
Good luck!
thank you sooo much!!!! now of to make them!!!!!!!!!!
DeleteAmazing! Absolutely amazing! I just love the authenticity. You are clearly very talented.
ReplyDeleteQuestion: My 9 yr-old daughter (4th grade) is making a film for her social studies class that takes place during the gold rush(1850's) - wondering if you (or anybody else) might know of a place where we could get (not pay a fortune/ rent?/borrow?) some period costumes (doctor, postman, miners the lady who owns the boarding house)?
Or if you have any ideas how to hint at these professions w/o a full costume? When i suggested just hanging a sign around their neck that says"doctor" my daughter thought that was a terrible idea & clearly "not authentic - at all!"
They would have to fit children (playing the parts). I told her it would be easier to just write a report :-)
Thanks!
I'm not sure where you live, but you could try local theaters and costume shops. Even high school theater departments will usually have a collection of items. For the girls, I'd just have them wear a dress or skirt and blouse, with an apron. Aprons are pretty easy to sew. Have them put their hair up in buns. The postman could have a satchel bag with letters in it. The doctor wouldn't dress as drs do today, but he could have a stethescope around his neck. Levi's were invented during the gold rush, I believe, so the "nonprofessionals", i.e. miners, could wear jeans. Khaki's, button up shirts, suspenders would be close enough for the others. To be authentic they'd all have coats and vests, but I can't see that being feasible. Good luck! Sounds like a fun project!
ReplyDeleteGreat tips! Thanks so much. Really appreciate the input!!
ReplyDeleteYou did such an amazing job! I just saw this on Liz Clark's Pinterest board. I'm still going to make me a corset and draft me a new dress -- I used Liz's book to draft my last dress, but not with a corset. Wow. Just Wow!
ReplyDeletehello! My daughters & son are going on a trek to Martin's Cove this July, & I am making them outfits for it. Like you, I really wanted more authentic costuming than the regular skirt, blouse & apron ~ as a result, I am making them full princess-line pioneer dresses with pantaloons, bonnets, petticoats & the like, & have thus been researching different styles on-line.
ReplyDeleteMay I just say, that in all of my researching, I have not found anything quite as awesome as yours!! How was it to trek in the full outfit? Especially the corset? (I don't think I'm going to make those ;-D) Thanks for the tips on starching, too, I didn't realize that the starching helped keep the skirts from staining ~ definitely worth doing if that's the case.
At any rate, I know the trek is supposed to be mainly focused on spirituality, however, I think that when you have to wear what your ancestors did, & everywhere you look, others are too, it's a lot easier to "get into the spirit of things."
How lucky to get to Trek in Martin's Cove! I was medical support staff, so I didn't have to do any actual cart pulling, but I did wear everything, except for taking off the corset for the dance. I was more worried about the heat, but we had unusually cool weather and I was happy for all the layers! The starching did pretty well at keeping things clean, but I did get some staining along the very bottom edge of my outer petticoat. If I go again I will probably make a patterned petticoat for that layer. You could then pull up the dress layer for doing anything particularly dirty to protect it. It's called a work petticoat and would be historically accurate. And I agree that it is easier to imagine what the experience is like when you are surrounded with visual reminders that "fit" what actually happened. I know that is not really feasible for all participants, but I would like it if they at least avoided flourescents and animal prints. : )
ReplyDeleteGood luck and I hope your kids have a great experience!
Well done! About fifty personal project's-worth here! :)
ReplyDeleteOne thing I learned recently about the layers they would wear...I would think it would have been hot as well, but what I learned is that they would drench and wring out the second layer or so in a stream of water and then it would not wet their legs and cause chaffing, but was also not wetting the exterior to increase soil and look wet. It would act like a little AC system! :) I loved that.
Interesting, Eme! Thanks for sharing!
DeleteNettie,
ReplyDeleteYour work is beautiful!
The cording tip on the bonnet: life-changing! Having worn a bonnet with modern thick interfacing and still having it "wilt", I can truly say "Wow, just wow".
Thanks for sharing your expertise and talents. :o)
Jeanette (another Nettie)
I've been surfing online over three hours today, yet I never discovered any fascinating article like yours. It's really sufficiently worth for me. As I would see it, if all website admins and bloggers made great substance as you did, the web will be significantly more helpful than any time in recent memory. nighty
ReplyDeleteYour thing is shows latent, m gona add this to my bookmarks. best wp themes
ReplyDeletethanks for the tips and information..i really appreciate it..
ReplyDeleteTshirt
your links are not working I have tried all of then as this is what I have been looking for.
ReplyDeleteI have been trying to find ideas for what to wear that hide my body better then your normal clothing.
Wow! Such an amazing and helpful post this is. I really really love it. It's so good and so awesome. I am just amazed. I hope that you continue to do your work like this in the future also. VDJ Courses
ReplyDeleteWow, I love it. Just getting started myself. Have made a petticoat, sleeveless chimise, skirt and guimpe, bought a wide brimmed bonnet (didn't trust my skills enough yet). Wanting to make a Daywrapper yet. Love your outfit!
ReplyDelete