Showing posts with label Provident Living. Show all posts

Monday, December 30, 2013

10 Principles of Using and Rotating Your Food Storage


10 Principles of Using and Rotating Your Food Storage
FIFO- First in, First Out.  Eat your oldest food first.  Use it or Lose it.
Date your long term food storage. 
Plan for the physical rotation.  Rotating shelves, in the back and out the front, use from left to right, or put the new stuff behind the old.
Make space in your kitchen to store food storage items.  Easy access makes a difference!
Use your food storage in recipes and meals you already eat.
Find new recipes which use food storage.  Food storage cookbooks or websites and blogs are great sources.
Plan to cook with your food storage.  Make it a routine to incorporate food storage into your meals every week.
Ask what can you do to make using a food more convenient?  For example, beans can be cooked in bulk and then frozen to be used more quickly.  Or buy a pressure cooker to cook them faster.
Store a variety of foods so you have more options in using them.
Learn substitutions such as using pureed cooked beans for a portion of the fat in baking.  Cooked beans for butter, pureed with a bit of water for oil.  Or replace a portion of meat, such as adding oats to meatloaf or refried beans to tacos.  Or replace the meat entirely with seasoned black beans. 
Try New Things!  Make your own yogurt, granola, mixes, grow wheat grass, cook wheat berries, etc.

Using Food Storage Recipes


Using Food Storage
Dry Milk
Orange Julius
In a blender, put 1 cup ice cubes, 1/3 c non-fat dry milk powder, capful of vanilla flavoring, ¼ c sugar.  Cover all with oj.  Blend till ice is fully incorporated.  Can add a couple bananas or handful of berries.  If they are frozen, omit the ice.

Banana Milk
2 bananas, fresh or frozen
1 capful vanilla
2 tablespoons sugar or a squirt of honey, optional
3 cups cold water
½ c, plus 1 T non fat dry milk or 1 c instant dry milk
Blend in blender till smooth.  Chill unless frozen fruit used.

Magic Mix from everydayfoodstorage.net
2 1/3 c powdered milk
1 c flour
1 c. (2 sticks) room temperature butter or margarine
Mix thoroughly with wire whisk attachment in mixer.  Store in fridge.  (Fits in a #10 can)
White Sauce using Magic Mix
Whisk 2/3 c magic mix into 1 c water and stir and heat over medium heat till it thickens. 
Pudding Using Magic Mix
½ c sugar
1 c magic mix
2-3 T cocoa, optional
2 c water
1 t vanilla
Mix dry ingredients well.  Stir in water and heat and stir over medium heat till it bubbles. Beat in vanilla.  Cover and chill.
Homemade Yogurt (4 ½ hrs)
½ c plain yogurt with live cultures (can reuse your own yogurt in the future)
3 c, plus 2 T nonfat dry milk
Run 2 qts plus 1 c jars in dishwasher with lids (can be pre used, clean lids.  We aren’t sealing them.)
Fill large crock pot with hot water, set on warm
Pour 1 qt water into large pot. Wisk in dry milk.  Wisk in another 1 qt water
Heat milk to 185-195 degrees F on 5, takes about 20 min.  Stir occasionally over 150 degrees.
Pour back into measuring bowl, set in sink of cold water halfway up handle and cool to 50 degrees C or put in fridge to cool for about 15 min
Pour ½ c milk into 1 c glass measure, add enough plain yogurt to reach 1 c.  stir well
Stir yogurt mix into rest of milk.  Ladle into jars and tightly screw on lids.
Lower jars into crock pot of water.
Let incubate 4 hours.  Water should be 50 degrees C.  Over 55 will kill good bacteria.
Refrigerate.

Monday, August 29, 2011

Making Your Own Yogurt


I saw a reference for making your own yogurt online and remembered I used to do it.  Most of the methods you see online make it more complicated than it needs to be.  Here is the recipe I had great success with, and you make it in the jars you'll store it in, in a crockpot.

Making Yogurt in a Crockpot

Ingredients
2 qts milk
2 T nonfat dry milk
1/2 c fresh yogurt with active cultures.


1.  Run 2 qt jars plus a 1 c jar in dishwasher with lids

2.  Fill large crock pot with hot water, set on warm.

3.  Measure 2 qts milk large measuring cup, then pour in large pot, and whisk in 2 T reg nonfat dry milk.

4.  Heat milk to 185-195 degrees F over medium heat.  (on 5 on my stove it takes 18 to 19 min.)  Stir    occasionally over 150 degrees to prevent scorching.

5.  Pour milk back into measuring bowl, set in sink of cold water halfway up handle and cool to 50 degrees C or put in fridge to cool for about 15 min till 50 degrees.

6.  Pour ½ c milk into 1 c glass measure, add enough fresh plain yogurt with active cultures to reach 
1 c.  Stir well.

7.  Stir yogurt mix into rest of milk.  Ladle into jars and tightly screw on lids.  Lower jars into crock pot of water.  Let incubate 4 hours.  Water should be 50 degrees C.  Over 55 will kill good bacteria.

8.  Refrigerate when done.  This yogurt will not be as thick as that you buy in the store.  You can use some of it to make your next batch.

Monday, March 8, 2010

Rethinking My Approach to Food Storage

I really have spent far too much of my life thinking about this, but once again I have changed my plan for our food storage. At least for our 3 month supply of foods we typically eat. Previously I had based my storage on 12 weeks worth of menus. It was great, because except for some perishables I never figured out how to store, I pretty much could cook anything I wanted to, IF I had my storage complete. Unfortunately, because it was what we usually eat, I never seem to manage to keep it complete.

Now, I'm thinking that wasn't the best approach to begin with. Since the idea is to have enough food for 3 months in the event of a crisis, I really should be storing 3 months of our usual CRISIS foods. In other words, if my world is falling apart around me, I'm not going to be making Korean potstickers and Bolgogi or Southwestern egg rolls, or anything else that is time or effort intensive. So, I am going to pare down my menu. It will now only contain meals that are:

1. Completely storable with no dependancy on perishables.
2. Simple and easy to prepare.
3. With an emphasis on Freezer Meals. Because freezer meals in a crisis are heavenly.

And I want a generator to keep my freezer going if the power goes out. (Is that a sign of finally being an adult if the one material thing you really want is a generator? Or maybe a power washer. I can't decide which I want more.)

By paring down my menus, I'll have fewer different items I am storing and trying to keep tracked of and up to date. I narrowed it down to a 6 week menu, which I am going to triple, so we have 18 weeks worth of food, or slightly over 4 months. That way we aren't below the 3 month target the very next time we have a meal.

I'd like to say I have finally figured it all out. But, I know I will come up with another revision to the plan. Anytime now, in fact.

Monday, November 3, 2008

It's Here!

Guess what arrived...


Thank you everyone for your suggestions! I've owned a hand crank mill for several years now. Even though I have had almost no wheat stored. That one would be great if we ever were to be without electricity. But, I think this one will be perfect for my everyday use! It is much bigger than I expected it to be, but it still fits where I planned on storing it. Is it weird to be excited about grinding flour? I just need my wheat shipment to arrive!

Tuesday, October 7, 2008

The Bread Quest: Or I Changed My Header

There is a panic in the air. Food prices are up. Food shortages have lead to rationing at church food storage centers and at food warehouses like Costco. Grain mill purchases are up and on back order. And now the economy seems to be bottoming out. Of course, I am no authority on all this. I don't know how much of it is hype or how much of it is self perpetuating panic. I do know that its finally been time to build up our food storage and learn to bake my own bread. If only because it was one of my new year's resolutions and the year is speeding by.

Not just bread, but whole wheat (or mostly whole wheat) bread. The kind you make from flour you grind yourself. We've never stored wheat, because I didn't want to buy something and not know how to use it or not be using it to rotate through it. But, now I think I am ready. It's not that I haven't made bread before. I have. It's just not great stuff that we want to have as our mainstay for toast and sandwich making. I've put it off, wanting the perfect recipe. One that is light, quick and easy to execute, using just a few inexpensive ingredients. So many wheat recipes have extra "stuff". Vital wheat gluten, Vitamin C tablets, Lecithin. Stuff I would need to store in addition in order to be able to make bread out of all that wheat. Ideally, I'd like a recipe that required no yeast even. One based on a reusable starter like the pioneer women would have used.

There is a recipe for just that in the Deseret Recipes cookbook published by the church. It is called Everlasting Yeast. I tried it for our Pioneer Days bread using the wheat bread recipe in the same book. I even did the kneading by hand. A friend, Nadine, makes wonderful bread from that recipe, and it turned out pretty good using the starter, although not as good as hers. I like knowing I have this way of bread baking should I ever need to bake bread with a limited or diminishing yeast supply. But, maintaining a starter doesn't fit my current lifestyle, so I decided to pass on using it as my main bread recipe.

I also tried a recipe demonstrated at simplylivingsmart.com. Because it is FAST. As in bread ready to bake in 45 minutes, including wheat grinding time. I didn't have the highly promoted equipment described, but it still turned out pretty good. And was fast. But, it seemed to lack something to me.

I've also learned a lot from and tried the recipes of two friends. But, still hadn't found the recipe that fit me. I finally found "the one". The Light Wheat recipe from this book:


Because Peter Reinhart is a bread making master and knows what he is talking about. I got this book for my dh for Christmas and he has had a lot of fun learning the art of artisan bread making from it. The french bread, raisin bread, pugliese and sticky bun recipes have all been amazing. Even though the light wheat recipe does not follow the slow ferment method that is the focus of the book, it turned out exactly the way that I wanted. Not heavy, good flavor, tender crust, soft and not crumbly. Perfect for sandwiches. I love that it uses room temperature water, as getting the temp right to not kill yeast has been a challenge in my past. And I used all purpose flour instead of bread flour without any problem. No gluten flour, vitamin c tablets or heating stuff on the stove. Nice and simple. I double it and make 3 loaves instead of 2. I did find that using the exact ingredients made a dough too dry. So now I hold out putting in all the flour at the first and add just enough at the end. I aim to have the dough just slightly sticky in the bottom of the bowl, remembering that it gets drier with kneading. Then I knead it till it gets all stretchy, about 6-8 minutes in my kitchen aid. Our favorite sandwhich bread recipe in the book is anadama bread. It has a wonderful flavor from cornmeal and molasses. But, it is an overnighter and slow riser, so I'm sticking to the light wheat as our main bread.

I worried that I wouldn't have time to be making all of our bread. But, despite our crazy fall schedule I haven't had to buy bread since before school started! So, I just placed our first big order for wheat: 450 lbs. Its all red wheat, but I'm hoping to get the remainder of our wheat as white wheat after the harvest next summer. Now, I just need to order a wheat grinder! Any suggestions?

Saturday, November 10, 2007

Raspberries

Not the slobbery on your belly kind. The luscious, juicy red kind.

My favorite thing I grow in our garden is the raspberries. Not only are the just about the tastiest thing I grow, they are also one of the easiest, and the best value for my efforts. If I had to buy my raspberries from the store, my family would rarely get them because they are so expensive!

Picking them was so much fun with Elsie this year. There is just something satisfying about seeing your 2 year old delightedly picking and eating berry after berry until her mouth and fingers are stained red. I really should have put down the berry bucket and taken some pictures, huh?

Photo Sharing and Video Hosting at Photobucket

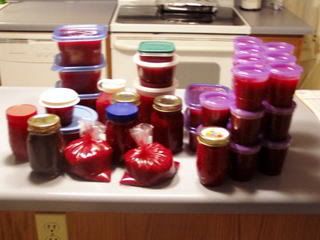
Raspberry harvest is over now, and I had accumulated a large stash of cleaned, smashed and frozen berries. So, yesterday was jam making day. I finished with 64 cups of raspberry and raspberry pear freezer jam. I ran out of freezer containers and even used a couple baggies. It was either that or sippy cups. And believe it or not it will all be long gone before the tasty berries are back next year.

And in case anyone was wondering, some if it will soon be found in a freezer in NJ...

Monday, September 10, 2007

Unprepared

That is what we are.

For family home evening tonight we had a "surprise" preparedness drill. A fake phone call alerted us to a Chemical spill on the freeway near our home and gave us 5 minutes to gather everything we would need to survive for the next 3 days. Everyone scrambled and five minutes later we found ourselves all loaded in the van. Our lack of preparedness was then obvious:

We had only a jug of apple juice. No water.
Our only source of shelter,warmth and bedding were two pillows and a Maddy sized poncho.
Our shoes were mostly flip flops, church shoes or sandals.
Only 2 of us had a change of clothing.
We had $10 cash.
Our food consisted of a half eaten loaf of raisin bread, a half eaten box of crackers and a box of granola bars.
Our partial 72 hour kit and comprehensive first aid kits were still in the basement.
And we totally had forgotten about the dog.

Worst of all, during those 5 minutes we managed to misplace Elsie. Turns out she had gotten her shoes and climbed into the car like she was supposed to. We lost precious time figuring that out, however.

To our credit we had plenty of diapers and wipes, toothpaste, a full tank of gas and our important documents. But not the wills.

We decided that not only should we have a complete 72 hour kit, but also an evacuation plan that included stewardship of little ones and pets. Although I knew where the 72 hour kit and first aid kits were, no one else did. And I couldn't carry them and the baby, and so I had focused on the documents and diapering needs. Hopefully, in a real emergency we would have more than 5 min, but even so it probably would be better to keep our emergency stuff more accessible to the car, and have everyone clearly know where it is.

So, now we have a plan of who does what and takes care of whom. Securing the little ones in the car will be first on the list. And in the coming weeks I am going to finally get that 72 hour kit up to date and complete. We are then going to redrill and see how we do....

My preparedness mission for this week: 2 gallons of water per person per day for drinking/sanitation and cooking needs. For our family that is 14 gallons. I'm thinking that three of these might be the way to go.