This was my favorite dessert for the December 50's menu experiment. It is called a pudding, but isn't the creamy stuff that comes to mind when we say pudding now. It is a little bit of work, but makes a pretty and delicious product. It is a steamed pudding, and the only one in the book that doesn't call for suet.
From Meta Given's Modern Encyclopedia of Cooking, 1959 revision
Raisin Crumb Pudding
An old-time moist, tasty, inexpensive pudding
1 tbsp fine dry breadcrumbs
1 c seedless raisins, washed
3/4 cup fine dry breadcrumbs
1 cup buttermilk
1/3 cup all-purpose flour
1/2 tsp cinnamon
1 tsp soda
1/8 tsp cloves
1/4 c soft butter
1/2 cup moist brown sugar, pkd
2 tbsp light molasses
1 egg, beaten
Steam raisins in a colander over boiling water for 5 minutes to plump them. Grease a 4 to 5 cup mold well with soft butter, then dust with the 1 tbsp crumbs, shaking to distribute evenly. (I didn't have a mold and used a short squat handle-less pot from our backpacking stove.) Get steamer ready. (I didn't have a steamer, so I improvised by using my largest pot and using a small metal trivet from my pressure cooker in the bottom to raise up the pudding "mold" so it doesn't sit directly on the bottom of the pot. You will want to add enough water to come up 1/3 of the way on the sides of the mold and have a total water volume of 1 to 2 quarts.) About 10 min before needed, add the water to the steamer and place it over low heat.
Cool and dry off plumped raisins. Mix the buttermilk with the 3/4 c dry bread crumbs and set aside for 10 min to soften. Sift flour, measure and resift 3 times with the next 3 ingredients. (I don't own a sifter and skipped that process, just mixed them together.) Stir in raisins. Cream butter and sugar thoroughly; beat in molasses until smooth and fluffy. Beat in egg well; stir in crumb mixture and flour-raisin misture just until well blended. Pour batter into prepared mol;' it should be about 3/4 full. Cover mold with a square of greased, floured parchment paper, fastened securely with rubber band. (I also put a square of aluminum foil on top of that, also secured with a rubber band, as recommended in another portion of the book on steaming puddings.)
Place mold in steamer, cover and steam vigorously for 1 hr; reduce heat and steam at a moderate rate for 2 hrs longer. (Add more water if needed) Lift out onto cake rack; remove lid or cover, and immediately invert pudding on cake rack covered with parchment paper. Parchment covers may be re-used in this way. Carefully lift off molds. Serve warm; or cool thoroughly, wrap in waxed paper, and store in refrigerator until ready to serve. Then reheat by steaming. Serve warm with hard sauce. (Steamed puddings should be served warm. Don't leave standing in steamer at the end of cooking to keep warm.) Makes 6 to 8 servings
For the hard sauce, I used one that did not have any alcohol in it. Although I believe that it is probably more customary to use one with. I found one at allrecipes.com that seemed to have a heritage dating back to the appropriate time frame. Hard Sauce for Cake

Showing posts with label Feeding My Family. Show all posts
Showing posts with label Feeding My Family. Show all posts
Tuesday, December 20, 2011
Monday, December 19, 2011
A 50's Weekday Menu
Another menu based on my cooking 50's style experiment. This one is meant for a weekday. No luncheon is included, because we don't have lunch together as a family, unlike what seemed to happen more frequently back then.
Breakfast
Freshly sliced oranges
Poached eggs on toast
Bacon
Milk
Dinner
Sausages
Pan fried onions
Mashed potatoes
Shredded lettuce with Mayonaise
Bread and butter
Apple Cobbler
Breakfast
Freshly sliced oranges
Poached eggs on toast
Bacon
Milk
Dinner
Sausages
Pan fried onions
Mashed potatoes
Shredded lettuce with Mayonaise
Bread and butter
Apple Cobbler
Sunday, December 18, 2011
A 50's Sunday Menu
I thought it would be fun to post a Sunday menu, based on the menu's I cooked for my 50's cooking experiment. It contains some of our favorite things I cooked.
Breakfast
Grapefruit halves
Griddle Cakes
Sausage
Syrup
Milk
Dinner
Roast Chicken
Dressing
Mashed potatoes and gravy
Corn
Whole Wheat Bread and Butter
Milk
Raisin Crumb Pudding with Hard Sauce
Supper
Egg Salad Sandwhiches
Dill Pickles
Pears
Cocoa
Breakfast
Grapefruit halves
Griddle Cakes
Sausage
Syrup
Milk
Dinner
Roast Chicken
Dressing
Mashed potatoes and gravy
Corn
Whole Wheat Bread and Butter
Milk
Raisin Crumb Pudding with Hard Sauce
Supper
Egg Salad Sandwhiches
Dill Pickles
Pears
Cocoa
Results of the 50's Cooking Experiment
My 50's cooking experiment has lasted longer than the original week I had intended. Either this menu is really idealized or the 50's housewife spent a lot of time in the kitchen. Cooking 50's style just doesn't mesh well with our busy lifestyle. So, the 50's meals have been spread out and intermixed with quicker, busy day meals. My family in general has loved 50's style cooking, especially breakfasts. Things I have learned about cooking 50's style:
1. They ate a lot more eggs and bacon and sausage. Bacon and sausage are served at 6 meals during the week, 5 breakfasts and one lunch. We kept the serving sizes to 1 or 2 slices each, to limit fat. Interestingly, when I've had 50's breakfast, even if I don't eat any more volume, I stay full until lunchtime.
2. There are a lot more "sides." Even for breakfast. So, instead of cereal and juice, one would serve cereal, toast, bacon and a dried fruit compote/grapefruit half/sliced oranges. Both my husband and I remember visiting grandma's and having them serve more complicated breakfasts like this. I always thought it was cooking for guests, but perhaps it was an everyday thing. My family loved eating breakfast this way every day.
3. Desserts were different. Most were made with very simple ingredients. It's amazing the variety of results you can get from using things like eggs, flour, butter, and cream. Fruits were frequently used. And desserts were served every night. Most of the deserts were surprisingly good. I had to learn several new cooking techniques: using a double boiler, steaming a pudding, baking a custard, poaching merengue.
4. Meals were pretty. Not every single meal, but most had a variety of color and texture. The number of sides made this easier to accomplish. But, overall a 50's meal was pleasing visually as well as in taste.
5. They used a lot of dried fruit. There is quite a range of fresh fruits and vegetables for a December menu, so they had pretty good access to a variety of produce. Some were not ones that we typically use and see at our grocery store, like brussel sprouts and rutabagas. But, dried fruit was still heavily used. I wondered if this was a carryover from times when produce was less available and dried foods would be needed in the winter months.
Sunday, December 4, 2011
Eating 50's Style

So, I'm onto my latest kooky experiment. I was recently reading a cookbook from the 50's: Meta Given's Modern Encyclopedia of Cooking. I love reading domestic books from that era. The way they phrase things and the insight into the homemaker mind at the time just fascinate and amuse me.
Anyways, I came across the menu planning section. In it they gave a week's worth of sample menus for each month of the year: "Using seasonal foods in thrifty balanced menus." Planning menus every week gets to be a drag sometimes, so I thought it might be fun to give these a try. It seemed like a fun way to get a glimpse of what cooking and eating at home was like in the 50's, in an immersive experience. Granted, the menu is probably an idealized one.
Some of the foods to be eaten daily:
quart of milk for children, pint for adults
meat, poultry, fish or cheese; liver or variety meat weekly
1 egg, if possible
a yellow or green veggie
white or sweet potatoes
1 other veggie
a serving of citrus or tomato
another fruit
You'll notice that there are 5 fruits and veggies. Qualifying for the "5 a day" campaign we hear about now. The menus also serve a dessert with every dinner and almost every lunch.
The guidelines for feeding young children differ from what we do today. Before the age of 5 or 6, the child should be served foods that are bland. Cereal should only be slightly sweetened. No pepper or spices, except a tiny amount on special occasions. No rich gravies or pastry. His heaviest meal should be mid-day, with his evening meal a milk soup, cereal and milk or bread and milk as its basis. And for convenience, the child may be fed early and sent to bed before the rest of the family is served. Needless to say, we aren't subjecting Cyrus to these guidelines.
The book emphasizes that because we no longer have the large appetites that our agrarian forefathers had, that we eat less food, and hence need to carefully select that food to make sure we cover all of our nutritional requirements. The meals tend to have a great more dishes served than I usually do. And yet, by strictly following the recipes according to serving sizes, I think they must have had much smaller serving sizes than we think of today.
The lunch menus are much more elaborate than I would ever do with just Cyrus and I at home, so I haven't been following them. We speculated that perhaps the rest of the family was more likely to come home and eat lunch at that time than happens now. A couple times I have replaced the dinner menu with the lunch menu, when the suggested dinner menu is likely to cause mutiny. Another interesting tidbit: on Sunday, lunch is called dinner and is the big meal of the day, and dinner is called supper.
Finally, The Meal Planner's Creed:
The health of my family is in my care; therefore--
I will spare no effort in planning meals containing the right kinds of foods in the right amounts.
Spending the food dollar to get the most for it is my job; therefore--
I will choose foods from a wide variety, variously priced to save money without sacrificing health.
My family's enjoyment of food is my responsibility; therefore--
I will increase their pleasure by preparing a variety of dishes attractive in color and form and pleasing in flavor and texture.
My family's health, security, and pleasure depend on my skill in planning meals; therefore--
I will treat my job with the respect due it.
Italics as written. This was serious business! As this was an era of modern labor saving advances, caring for the family and serving them food was much easier than it had ever been. What does a woman do with all that extra time? Why, raise standards and use it to do what she does even better! I'm speculating that is what happened. And that perfect housewife paradigm then led to the feminist revolt, perhaps? Anyone know of a good history book on this subject?
Wednesday, January 12, 2011
E-mealz
Have you heard of E-mealz? It's a menu/shopping list planning subscription service. For $5 a month, you receive an economical menu, cooking directions and shopping list for the grocery store of your choice. The menus are planned around what is available and on sale at that store. There are multiple options for menu types, as well. If you are vegetarian, for example. They happen to have all 3 of the potential grocery stores I shop at. I was curious to know how well it worked and if my family would like it, so I printed off some of the sample menus/lists to give it a little try. They only have 3 meals out of the usual 7, but still enough for a taste of what it is like. We tried the Walmart one this week and it was a big thumbs up. Sweet and sour pork roast, Chinese chicken salad and Tostados. Almost everyone loved every meal. And it was nice to not only know I had everything on hand, but also have the side dishes all planned out. And it wasn't the same old stuff I always think of doing. I'm going to try the Aldi, Kroger and low fat options next. If it continues to rock my world, I may subscribe for awhile.
Monday, March 8, 2010
Rethinking My Approach to Food Storage
I really have spent far too much of my life thinking about this, but once again I have changed my plan for our food storage. At least for our 3 month supply of foods we typically eat. Previously I had based my storage on 12 weeks worth of menus. It was great, because except for some perishables I never figured out how to store, I pretty much could cook anything I wanted to, IF I had my storage complete. Unfortunately, because it was what we usually eat, I never seem to manage to keep it complete.
Now, I'm thinking that wasn't the best approach to begin with. Since the idea is to have enough food for 3 months in the event of a crisis, I really should be storing 3 months of our usual CRISIS foods. In other words, if my world is falling apart around me, I'm not going to be making Korean potstickers and Bolgogi or Southwestern egg rolls, or anything else that is time or effort intensive. So, I am going to pare down my menu. It will now only contain meals that are:
1. Completely storable with no dependancy on perishables.
2. Simple and easy to prepare.
3. With an emphasis on Freezer Meals. Because freezer meals in a crisis are heavenly.
And I want a generator to keep my freezer going if the power goes out. (Is that a sign of finally being an adult if the one material thing you really want is a generator? Or maybe a power washer. I can't decide which I want more.)
By paring down my menus, I'll have fewer different items I am storing and trying to keep tracked of and up to date. I narrowed it down to a 6 week menu, which I am going to triple, so we have 18 weeks worth of food, or slightly over 4 months. That way we aren't below the 3 month target the very next time we have a meal.
I'd like to say I have finally figured it all out. But, I know I will come up with another revision to the plan. Anytime now, in fact.
Wednesday, December 24, 2008
Christmas Eve Dinner

I decided to try a new tradition this year for Christmas Eve. We tried to have a meal that would have been similar to what Jesus would have eaten. After doing some research I came up with the following menu:
Dried dates and apricots
cheese
Dried meat (beef jerky)
olives
apples, grapes, pomegranate
rustic bread
Pita bread
olive spread
It sounded kind of funny, but it was amazing how well all the flavors went together. The kids really enjoyed trying some new foods, too. And since it was an easy meal to prepare, that helped us think about the Savior, I think I will make it again next year.
Monday, November 3, 2008
It's Here!
Guess what arrived...

Thank you everyone for your suggestions! I've owned a hand crank mill for several years now. Even though I have had almost no wheat stored. That one would be great if we ever were to be without electricity. But, I think this one will be perfect for my everyday use! It is much bigger than I expected it to be, but it still fits where I planned on storing it. Is it weird to be excited about grinding flour? I just need my wheat shipment to arrive!
Thank you everyone for your suggestions! I've owned a hand crank mill for several years now. Even though I have had almost no wheat stored. That one would be great if we ever were to be without electricity. But, I think this one will be perfect for my everyday use! It is much bigger than I expected it to be, but it still fits where I planned on storing it. Is it weird to be excited about grinding flour? I just need my wheat shipment to arrive!
Tuesday, October 7, 2008
The Bread Quest: Or I Changed My Header
There is a panic in the air. Food prices are up. Food shortages have lead to rationing at church food storage centers and at food warehouses like Costco. Grain mill purchases are up and on back order. And now the economy seems to be bottoming out. Of course, I am no authority on all this. I don't know how much of it is hype or how much of it is self perpetuating panic. I do know that its finally been time to build up our food storage and learn to bake my own bread. If only because it was one of my new year's resolutions and the year is speeding by.
Not just bread, but whole wheat (or mostly whole wheat) bread. The kind you make from flour you grind yourself. We've never stored wheat, because I didn't want to buy something and not know how to use it or not be using it to rotate through it. But, now I think I am ready. It's not that I haven't made bread before. I have. It's just not great stuff that we want to have as our mainstay for toast and sandwich making. I've put it off, wanting the perfect recipe. One that is light, quick and easy to execute, using just a few inexpensive ingredients. So many wheat recipes have extra "stuff". Vital wheat gluten, Vitamin C tablets, Lecithin. Stuff I would need to store in addition in order to be able to make bread out of all that wheat. Ideally, I'd like a recipe that required no yeast even. One based on a reusable starter like the pioneer women would have used.
There is a recipe for just that in the Deseret Recipes cookbook published by the church. It is called Everlasting Yeast. I tried it for our Pioneer Days bread using the wheat bread recipe in the same book. I even did the kneading by hand. A friend, Nadine, makes wonderful bread from that recipe, and it turned out pretty good using the starter, although not as good as hers. I like knowing I have this way of bread baking should I ever need to bake bread with a limited or diminishing yeast supply. But, maintaining a starter doesn't fit my current lifestyle, so I decided to pass on using it as my main bread recipe.
I also tried a recipe demonstrated at simplylivingsmart.com. Because it is FAST. As in bread ready to bake in 45 minutes, including wheat grinding time. I didn't have the highly promoted equipment described, but it still turned out pretty good. And was fast. But, it seemed to lack something to me.
I've also learned a lot from and tried the recipes of two friends. But, still hadn't found the recipe that fit me. I finally found "the one". The Light Wheat recipe from this book:

Because Peter Reinhart is a bread making master and knows what he is talking about. I got this book for my dh for Christmas and he has had a lot of fun learning the art of artisan bread making from it. The french bread, raisin bread, pugliese and sticky bun recipes have all been amazing. Even though the light wheat recipe does not follow the slow ferment method that is the focus of the book, it turned out exactly the way that I wanted. Not heavy, good flavor, tender crust, soft and not crumbly. Perfect for sandwiches. I love that it uses room temperature water, as getting the temp right to not kill yeast has been a challenge in my past. And I used all purpose flour instead of bread flour without any problem. No gluten flour, vitamin c tablets or heating stuff on the stove. Nice and simple. I double it and make 3 loaves instead of 2. I did find that using the exact ingredients made a dough too dry. So now I hold out putting in all the flour at the first and add just enough at the end. I aim to have the dough just slightly sticky in the bottom of the bowl, remembering that it gets drier with kneading. Then I knead it till it gets all stretchy, about 6-8 minutes in my kitchen aid. Our favorite sandwhich bread recipe in the book is anadama bread. It has a wonderful flavor from cornmeal and molasses. But, it is an overnighter and slow riser, so I'm sticking to the light wheat as our main bread.
I worried that I wouldn't have time to be making all of our bread. But, despite our crazy fall schedule I haven't had to buy bread since before school started! So, I just placed our first big order for wheat: 450 lbs. Its all red wheat, but I'm hoping to get the remainder of our wheat as white wheat after the harvest next summer. Now, I just need to order a wheat grinder! Any suggestions?
Not just bread, but whole wheat (or mostly whole wheat) bread. The kind you make from flour you grind yourself. We've never stored wheat, because I didn't want to buy something and not know how to use it or not be using it to rotate through it. But, now I think I am ready. It's not that I haven't made bread before. I have. It's just not great stuff that we want to have as our mainstay for toast and sandwich making. I've put it off, wanting the perfect recipe. One that is light, quick and easy to execute, using just a few inexpensive ingredients. So many wheat recipes have extra "stuff". Vital wheat gluten, Vitamin C tablets, Lecithin. Stuff I would need to store in addition in order to be able to make bread out of all that wheat. Ideally, I'd like a recipe that required no yeast even. One based on a reusable starter like the pioneer women would have used.
There is a recipe for just that in the Deseret Recipes cookbook published by the church. It is called Everlasting Yeast. I tried it for our Pioneer Days bread using the wheat bread recipe in the same book. I even did the kneading by hand. A friend, Nadine, makes wonderful bread from that recipe, and it turned out pretty good using the starter, although not as good as hers. I like knowing I have this way of bread baking should I ever need to bake bread with a limited or diminishing yeast supply. But, maintaining a starter doesn't fit my current lifestyle, so I decided to pass on using it as my main bread recipe.
I also tried a recipe demonstrated at simplylivingsmart.com. Because it is FAST. As in bread ready to bake in 45 minutes, including wheat grinding time. I didn't have the highly promoted equipment described, but it still turned out pretty good. And was fast. But, it seemed to lack something to me.
I've also learned a lot from and tried the recipes of two friends. But, still hadn't found the recipe that fit me. I finally found "the one". The Light Wheat recipe from this book:
Because Peter Reinhart is a bread making master and knows what he is talking about. I got this book for my dh for Christmas and he has had a lot of fun learning the art of artisan bread making from it. The french bread, raisin bread, pugliese and sticky bun recipes have all been amazing. Even though the light wheat recipe does not follow the slow ferment method that is the focus of the book, it turned out exactly the way that I wanted. Not heavy, good flavor, tender crust, soft and not crumbly. Perfect for sandwiches. I love that it uses room temperature water, as getting the temp right to not kill yeast has been a challenge in my past. And I used all purpose flour instead of bread flour without any problem. No gluten flour, vitamin c tablets or heating stuff on the stove. Nice and simple. I double it and make 3 loaves instead of 2. I did find that using the exact ingredients made a dough too dry. So now I hold out putting in all the flour at the first and add just enough at the end. I aim to have the dough just slightly sticky in the bottom of the bowl, remembering that it gets drier with kneading. Then I knead it till it gets all stretchy, about 6-8 minutes in my kitchen aid. Our favorite sandwhich bread recipe in the book is anadama bread. It has a wonderful flavor from cornmeal and molasses. But, it is an overnighter and slow riser, so I'm sticking to the light wheat as our main bread.
I worried that I wouldn't have time to be making all of our bread. But, despite our crazy fall schedule I haven't had to buy bread since before school started! So, I just placed our first big order for wheat: 450 lbs. Its all red wheat, but I'm hoping to get the remainder of our wheat as white wheat after the harvest next summer. Now, I just need to order a wheat grinder! Any suggestions?
Thursday, February 14, 2008
Yummy Treats
Elsie and I made one of my favorite treats to share with the family for valentine's day. These are so easy to make and very addictive!


Preheat oven to 250 degrees. Spread waffle shaped pretzels on waxed paper on a cookie sheet. Top each with a Hershey kiss. This is where trying different flavors is really fun. We used peanut butter kisses this time. Put in the oven for 1-2 min until chocolate is softened. Watch them carefully, the time will vary depending upon the flavor of kisses you choose. The peanut butter ones seem to soften a bit quicker. Remove from oven, and immediately press an M&M or Reeses Pieces into the top of each kiss. Let cool and enjoy! I throw them in the freezer because I hate waiting!
Preheat oven to 250 degrees. Spread waffle shaped pretzels on waxed paper on a cookie sheet. Top each with a Hershey kiss. This is where trying different flavors is really fun. We used peanut butter kisses this time. Put in the oven for 1-2 min until chocolate is softened. Watch them carefully, the time will vary depending upon the flavor of kisses you choose. The peanut butter ones seem to soften a bit quicker. Remove from oven, and immediately press an M&M or Reeses Pieces into the top of each kiss. Let cool and enjoy! I throw them in the freezer because I hate waiting!
Monday, November 12, 2007
Turtle Pumpkin Pie. Holy Yum!
We made this for the treat for family home evening tonight. I made my graham cracker crust from scratch, using cinnamon graham crackers, 4 T butter and 1/4 c sugar baked for 10 min at 350 degrees. And then I whipped a cup of heavy whipping cream with a t. of vanilla and 1/4 c. powdered sugar to use in place of the Cool Whip. Very easy and a big hit with everyone in the family!
Turtle Pumpkin Pie
Prep Time: 15 min
Total Time: 1 hr 15 min
Makes: 10 servings, one slice each
1/4 cup plus 2 Tbsp. caramel ice cream topping, divided
1 HONEY MAID Graham Pie Crust (6 oz.)
1/2 cup plus 2 Tbsp. PLANTERS Pecan Pieces, divided
1 cup cold milk
2 pkg. (4-serving size each) JELL-O Vanilla Flavor Instant Pudding & Pie Filling
1 cup canned pumpkin
1 tsp. ground cinnamon
1/2 tsp. ground nutmeg
1 tub (8 oz.) COOL WHIP Whipped Topping, thawed, divided
POUR 1/4 cup caramel topping into crust; sprinkle with 1/2 cup pecans.
BEAT milk, dry pudding mixes, pumpkin and spices with whisk until blended. Stir in 1-1/2 cups whipped topping. Spread into crust.
REFRIGERATE 1 hour. Top with remaining whipped topping, caramel topping and pecans just before serving. Store leftovers in refrigerator.
Saturday, November 10, 2007
Raspberries
Not the slobbery on your belly kind. The luscious, juicy red kind.
My favorite thing I grow in our garden is the raspberries. Not only are the just about the tastiest thing I grow, they are also one of the easiest, and the best value for my efforts. If I had to buy my raspberries from the store, my family would rarely get them because they are so expensive!
Picking them was so much fun with Elsie this year. There is just something satisfying about seeing your 2 year old delightedly picking and eating berry after berry until her mouth and fingers are stained red. I really should have put down the berry bucket and taken some pictures, huh?
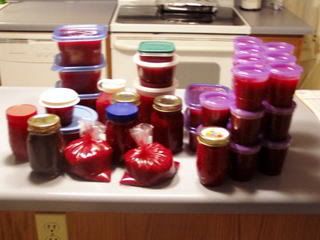
Raspberry harvest is over now, and I had accumulated a large stash of cleaned, smashed and frozen berries. So, yesterday was jam making day. I finished with 64 cups of raspberry and raspberry pear freezer jam. I ran out of freezer containers and even used a couple baggies. It was either that or sippy cups. And believe it or not it will all be long gone before the tasty berries are back next year.
And in case anyone was wondering, some if it will soon be found in a freezer in NJ...
My favorite thing I grow in our garden is the raspberries. Not only are the just about the tastiest thing I grow, they are also one of the easiest, and the best value for my efforts. If I had to buy my raspberries from the store, my family would rarely get them because they are so expensive!
Picking them was so much fun with Elsie this year. There is just something satisfying about seeing your 2 year old delightedly picking and eating berry after berry until her mouth and fingers are stained red. I really should have put down the berry bucket and taken some pictures, huh?
Raspberry harvest is over now, and I had accumulated a large stash of cleaned, smashed and frozen berries. So, yesterday was jam making day. I finished with 64 cups of raspberry and raspberry pear freezer jam. I ran out of freezer containers and even used a couple baggies. It was either that or sippy cups. And believe it or not it will all be long gone before the tasty berries are back next year.
And in case anyone was wondering, some if it will soon be found in a freezer in NJ...
Wednesday, September 19, 2007
Works for Me Wednesday: Easy Breakfasts
Marvin started taking early morning seminary this year. Which means he needs to leave the house by 6 am. I'll happily get up that early to see him off and make him a lunch, but I just don't have it in me to make him breakfast that early. Since he is gone almost 10 hours, he really needs to have a good breakfast before he goes.
I love how having freezer meals makes my dinner making easier, so I thought I would apply the same approach to making breakfasts. So, I spent Monday morning making muffins, pumpkin nut bread, wheat bread and freezer biscuits. (And some frozen ginger cookie dough.) I can just put out a frozen item on the table the night before and it is thawed and ready to eat in the morning.
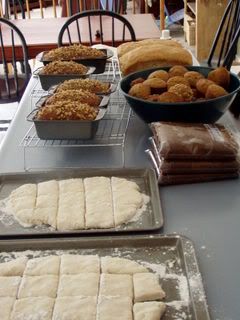
Freezer biscuits were served at a victorian bed and breakfast in Iowa. They are a very clever way to have quick, hot, homemade biscuits in the morning. No prethawing required.

Another easy breakfast is to layer yogurt, fruit and granola to make a breakfast parfait. If we make one in disposable cup with a plastic spoon, it makes a great on the go meal. ItyBtyFrog has a great crock pot granola recipe on her blog.
Here are the recipes for the muffins/pumpkin nut bread, freezer biscuits, and just because ItyBty is looking for one, for General Tsao's Chicken.
Pumpkin Nut Bread/Muffins
(I double this and it makes 3 dozen muffins, a medium loaf and 4 mini loaves. And its absolutely incredible with chocolate chips added!)
1 cup oil
2 3/4 cups sugar
4 eggs
2 cups pumpkin, pureed
1 cup orange juice
4 cups flour
2 teaspoons baking soda
1 1/2 teaspoons salt
1/2 teaspoon baking powder
1 teaspoon cinnamon
1/2 teaspoon cloves
1/2 teaspoon allspice
1 1/2 cups chopped nuts
1. Preheat oven to 350 degrees.
2. Spray 2 large and one smaller loaf pans with cooking spray. Line bottoms with waxed paper. Spray waxed paper.
3. Cream oil and sugar.
4. Mix in eggs, pumpkin and orange juice. (If fresh pumpkin is not pureed, blend eggs and pumpkin in blender first.)
5. Pile flour on top of wet ingredients. Stir remaining dry ingredients into flour.
6. Pile one cup of the chopped nuts on top of dry mixture, then mix dry ingredients in with wet until just moistened.
7. Pour into prepared pans. Sprinkle tops with remaining nuts.
8. Bake 50 to 55 minutes for large loaves, 35 minutes for mini loaves, 20 minutes for muffins till pick done. Cool on wire rack 10 min. Remove from pan and cool completely.
Freezer Biscuits
4 cups flour
8 teaspoons baking powder
1/4 cup sugar
1 teaspoon cream of tartar
1 cup shortening
1 1/2 cups milk
1 teaspoon salt
1 egg
1. Mix dry ingredients and cut in shortening with pastry blender or two knives till shortening is pea sized.
2. Add remaining ingredients and stir till just combined.
3. Generously flour two cookie sheets and with floured hands, pat out half of the dough on each. Cut into 2 inch squares. (Can also cut out using a biscuit cutter)
4. Put cookie sheets in freezer. Once biscuts are frozen, transfer to an airtight freezer bag.
5. To bake, place desired amount of frozen biscuits on greased cookie sheet. Bake 15-20 min in an oven preheated to 375 degrees.
General Tsao's Chicken
2 tablespoons soy sauce
1/2 teaspoon hoisin sauce
1/2 teaspoon oyster sauce
1/2 teaspoon sugar
2 tablespoons sugar
1 teaspoon vinegar
1/2 cup chicken broth
1 tablespoon cornstarch
1/4 teaspoon pepper
1/2 teaspoon ginger
1/2 teaspoon hot sauce (opt.)
2 boneless, skinless chicken breasts
1 egg
1/2 cup cornstarch
3 cups oil
1/4 cup scallion, sliced
1/2 teaspoon sesame oil
1. Heat oil. Cut up chicken into 1 to 2 inch cubes. Coat with beaten egg. Then coat with cornstarch.
2. Fry in oil till golden. Remove from oil and put in strainer. Gently loosen pieces with large spoon. Return to oil for 30 sec. more.
3. Remove and drain.
4. Mix first eleven ingredients to form brown sauce.
5. Heat brown sauce with scallion till thickened. Add chicken, stir and heat through.
6. Remove from heat, stir in sesame oil and serve.
For more great Works For Me Wednesday Ideas, check out Shannon's blog!
I love how having freezer meals makes my dinner making easier, so I thought I would apply the same approach to making breakfasts. So, I spent Monday morning making muffins, pumpkin nut bread, wheat bread and freezer biscuits. (And some frozen ginger cookie dough.) I can just put out a frozen item on the table the night before and it is thawed and ready to eat in the morning.
Freezer biscuits were served at a victorian bed and breakfast in Iowa. They are a very clever way to have quick, hot, homemade biscuits in the morning. No prethawing required.
Another easy breakfast is to layer yogurt, fruit and granola to make a breakfast parfait. If we make one in disposable cup with a plastic spoon, it makes a great on the go meal. ItyBtyFrog has a great crock pot granola recipe on her blog.
Here are the recipes for the muffins/pumpkin nut bread, freezer biscuits, and just because ItyBty is looking for one, for General Tsao's Chicken.
Pumpkin Nut Bread/Muffins
(I double this and it makes 3 dozen muffins, a medium loaf and 4 mini loaves. And its absolutely incredible with chocolate chips added!)
1 cup oil
2 3/4 cups sugar
4 eggs
2 cups pumpkin, pureed
1 cup orange juice
4 cups flour
2 teaspoons baking soda
1 1/2 teaspoons salt
1/2 teaspoon baking powder
1 teaspoon cinnamon
1/2 teaspoon cloves
1/2 teaspoon allspice
1 1/2 cups chopped nuts
1. Preheat oven to 350 degrees.
2. Spray 2 large and one smaller loaf pans with cooking spray. Line bottoms with waxed paper. Spray waxed paper.
3. Cream oil and sugar.
4. Mix in eggs, pumpkin and orange juice. (If fresh pumpkin is not pureed, blend eggs and pumpkin in blender first.)
5. Pile flour on top of wet ingredients. Stir remaining dry ingredients into flour.
6. Pile one cup of the chopped nuts on top of dry mixture, then mix dry ingredients in with wet until just moistened.
7. Pour into prepared pans. Sprinkle tops with remaining nuts.
8. Bake 50 to 55 minutes for large loaves, 35 minutes for mini loaves, 20 minutes for muffins till pick done. Cool on wire rack 10 min. Remove from pan and cool completely.
Freezer Biscuits
4 cups flour
8 teaspoons baking powder
1/4 cup sugar
1 teaspoon cream of tartar
1 cup shortening
1 1/2 cups milk
1 teaspoon salt
1 egg
1. Mix dry ingredients and cut in shortening with pastry blender or two knives till shortening is pea sized.
2. Add remaining ingredients and stir till just combined.
3. Generously flour two cookie sheets and with floured hands, pat out half of the dough on each. Cut into 2 inch squares. (Can also cut out using a biscuit cutter)
4. Put cookie sheets in freezer. Once biscuts are frozen, transfer to an airtight freezer bag.
5. To bake, place desired amount of frozen biscuits on greased cookie sheet. Bake 15-20 min in an oven preheated to 375 degrees.
General Tsao's Chicken
2 tablespoons soy sauce
1/2 teaspoon hoisin sauce
1/2 teaspoon oyster sauce
1/2 teaspoon sugar
2 tablespoons sugar
1 teaspoon vinegar
1/2 cup chicken broth
1 tablespoon cornstarch
1/4 teaspoon pepper
1/2 teaspoon ginger
1/2 teaspoon hot sauce (opt.)
2 boneless, skinless chicken breasts
1 egg
1/2 cup cornstarch
3 cups oil
1/4 cup scallion, sliced
1/2 teaspoon sesame oil
1. Heat oil. Cut up chicken into 1 to 2 inch cubes. Coat with beaten egg. Then coat with cornstarch.
2. Fry in oil till golden. Remove from oil and put in strainer. Gently loosen pieces with large spoon. Return to oil for 30 sec. more.
3. Remove and drain.
4. Mix first eleven ingredients to form brown sauce.
5. Heat brown sauce with scallion till thickened. Add chicken, stir and heat through.
6. Remove from heat, stir in sesame oil and serve.
For more great Works For Me Wednesday Ideas, check out Shannon's blog!
Tuesday, May 16, 2006
Works For Me: Butter Crock

It's Wednesday! Time to participate in Shannon's Works For Me Wednesday.

We love to have butter to spread on bread at the table or on toast. (Duh, who doesn't?) In the summer it tends to get too soft in the heat and spoil more quickly when left out on the counter. Kept in the fridge, it gets too firm for ease of spreading and tears the bread or toast. One day, at my brother in laws, we noticed they were using something called a butter crock. We have one now, too. They are fabulous! Before refridgeration was common, food was often kept fresh by putting it in stoneware crocks which were then submerged in cold water. The butter crock, or bell, as it is sometimes called, works the same way. The butter stays nice and spreadable and fresh for up to 30 days. And it is a lovely way to serve butter!
To find one, look here.
Works for me!
"Man has always decorated those objects related to the eating ritual. There is only one reason for this--to make the process of meal preparation and presentation more satisfying. No matter what your traditions or tastes, there is a real opportunity for self-expression and enjoyment in the selection and use of the containers in which you serve food and drink." -Alexandra Stoddard
Friday, April 28, 2006
Easy Croissant Recipe
I just found a new recipe that is a "keeper", as my kids would say. I love to try new recipes and try to make one at least once a week. This week we tried Glazed Cheese Croissants. They were amazingly easy and everyone liked them, except my husband who has never liked any croissants.
1/2 stick butter, room temperature
3/4 cup small curd cottage cheese
1 c flour
Combine all ingredients using a cutting motion and two knives or using a pastry blender to form dough. (Little bits of butter and cottage cheese should still be visible to get the flakiness.) Wrap in plastic wrap and chill 2 hours. Preheat oven to 350 degrees. On floured surface (I floured and rolled it out on my baking stone), roll into a 14 inch circle. Cut into 8 triangles (I used my pizza cutter). Roll each triangle from wide end to tip, turning ends to form a crescent shape. Place on baking stone or cookie sheet. Bake 30 min. till golden. Cool 10 minutes on wire rack. Meanwhile combine 1/2 c. powdered sugar with a bit of milk to form drizzly glaze. Drizzle over croissants. Serve warm or cooled.
I made up a double batch for my family of 6. We took them and red pears to Marvin's track meet. It was freezing and we were not adequately dressed, so the girl's and I had a picnic in the van while DH watched the meet. The girl's thought it was a blast!
Recipe adapted from April F. Smith, Bountiful, Utah
Tuesday, April 25, 2006
Works for Me: Chopsticks


I'm participating again in Shannon's Works for me Wednesday Tip over at Rocks In My Dryer.
Okay, this is my Works for Me Wednesday Tip:
I keep a chopstick in the flour canister. That way it is always handy for leveling flour when measuring. Another chopstick stored with the measuring cups is handy for leveling everything else.
Thursday, March 30, 2006
Ahhh, Kielbasa!

Tonight Emily (my 8 yr old) helped me make dinner:
Kielbasa Soup
1 Pkg Kielbasa, sliced
Medium onion, chopped
1 can corn
1 can green beans
a few potatoes, peeled and cut into bite size pieces
Fry kielbasa and onion till onion is transluscent. Add canned veggies with their juices, the potatoes and enough water to just cover veggies. Bring to boil, reduce heat and simmer till potatoes are tender. Season with salt and pepper to taste and serve. Quick and yummy!
Subscribe to:
Posts (Atom)